Saturday, December 14, 2024

Coast to Coast Creators Blog Hop - Sketch Challenge


Welcome to our December Coast to Coast Creators Blog Hop! This month we were given a sketch challenge! 

I decided to give you a sneak peek of the Friends of the Ocean Suite Collection coming in the January - April 2025 Mini Catalogue being released on January 7th!


This is the sketch which came from the Paper Craft Crew! I love the diamond shapes and simple design!

I started with a Thick Basic White card base and added a layer of the Friends of the Ocean 12" x 12" Designer Series Paper. I added some Melon Mambo coral which was die cut with the Ocean Friends Dies, and three Basic White squares die cut with the Stylish Shapes Dies. I added some Pumpkin Pie and Melon Mambo ink to the squares with Blending Brushes.


The crabs were die cut from the DSP and adhered to the squares with Stampin' Dimensionals. The sentiment, from the Ocean Friends Stamp Set, was stamped in Versamark on Melon Mambo and heat embossed in white.


I finished the card with Sunny Day Iridescent Dots. 

Please enjoy hopping around below to see the projects created by my talented teammates!


You are invited to the Inlinkz link party!

Click here to enter
Wednesday, December 11, 2024

AWOW Blog Hop - Technique Challenge


Welcome to this month's Around the World on Wednesday Blog Hop! Each month, a group of  demonstrators from all over the world create projects based on that month's theme. You will be able to hop around below to see all the wonderful inspiration!

This month, the theme is a Technique Challenge of our choice, focusing on a technique new to us or one that we haven't used in a long time. I chose to try something brand new to me! 


I decided to try my hand at free-handing a watercolour scene, using Stampin' Up!'s Water Painters, Watercolor Paper and Ink Refills! Although I can see that it could use some improvement, I was quite happy with my first attempt!


I started with half a sheet of our Fluid 100 Watercolor Paper (3 1/2" x 5") and wet the top half with plain water. I put some ink on acrylic blocks. I then used the wide-brushed Water Painter to swish some Balmy Blue ink across the top and a couple of swooshes in the snow at the bottom. I used Blueberry Bushel to paint some mountains. I then used Night of Navy and the small brush to paint the trees.

I added some white to the mountains and trees with Dr Ph. Martin's Bleed Proof White paint but I think you could use some of our White Craft Ink instead. I also splattered a little Wink of Stella all over for some glitter.


The sentiment, from the Peaceful Season Stamp Set was stamped in Versamark and heat embossed in white. It was cut with a Stylish Shapes circle die. Cardstock used was Night of Navy, Blueberry Bushel and Brushed Silver Foil. I finished with some Rhinestone Basic Jewels.


Please enjoy hopping around below and you can click on the daisy to go to the next blog post by my very talented colleague, Cheryl Hamilton!


Thursday, November 28, 2024

Nests of Winter - Ink & Inspiration Blog Hop


Welcome to our November Ink & Inspiration Blog Hop! I am hopping with talented demonstrators from all over the world! This month, we were inspired to create with this Colour Inspiration!


I was also inspired by the photo of the bird and decided to use the Nests of Winter Designer Series Paper as the focus of this card!

The only stamping on this card is the sentiment (from Reindeer Days) stamped in Versamark and heat embossed in white on Garden Green. 


The card base is Crumb Cake and other cardstock colours used are Garden Green and Calypso Coral. I darkened the Calypso Coral cardstock die-cuts with the Calypso Coral Blends. The leaves were die cut using the Winterly Tree Tops Dies. The circle was die cut using Spotlight on Nature Dies.


I finished with Earth Tones Shimmer Gems.

Enjoy hopping!


Thursday, November 14, 2024

Coast to Coast Creators Blog Hop - No Red, Green, Gold or Silver!


Welcome to our November Coast to Coast Creators Blog Hop! This month we were challenged to do a card without the traditional red, green gold and silver! I chose to use the One of a Kind Bundle with a Pool Party colour scheme!


The background is stamped in Pool Party with the Falling Snow Stamp Set. The Pool Party circle is cut with the Stylish Shapes Dies. The gorgeous ribbon is the Pool Party 5/8" Pompom Ribbon.


The larger snowflake is stamped in Pool Party and die cut. The two smaller snowflakes are die cut from Pool Party and white Glimmer Paper from the Berry Burst, Old Olive and White Glimmer Paper package. I used a Sponge Dauber to add some Pool Party ink to the glimmer snowflake.


The sentiment is stamped in Pool Party and die cut with a Stylish Shapes square.

Be sure to hop around below to see the beautiful cards made by my talented teammates!


You are invited to the Inlinkz link party!

Click here to enter

Wednesday, November 13, 2024

AWOW Blog Hop - Holiday Vibes Colour Challenge


Welcome to this month's Around the World on Wednesday Blog Hop! Each month, a group of  demonstrators from all over the world create projects based on that month's theme. You will be able to hop around below to see all the wonderful inspiration!

This month, the theme is a Holiday Vibes Colour Challenge! We had a choice of traditional Christmas colours or the coastal colours in the photo below.


I never thought I'd choose Summer Splash for a Christmas card! I chose to do a monochromatic card using this colour along with the Sophisticated Sled Bundle.


The card base, sentiment banner and Designer Series Paper circle are all in Summer Splash. I used Pretty Peacock for the second layer and the glimmer circle. The large layer of DSP is from the Sentimental Christmas 12" x 12" Designer Series Paper.


The skates are die-cut using the Sophisticated Sled Dies in Basic White, Silver Foil and Pretty Peacock. The skates are hanging from the new Lost Lagoon Soft Cording and the gem is from the Faceted Gems Trio Pack.


I wrapped a piece of Bordered Ribbon in Summer Splash around the bottom of the layer. The sentiment is stamped in Pretty Peacock ink and die-cut with a Stylish Shapes banner.


Please enjoy hopping around below and you can click on the daisy to go to the next blog post by my very talented colleague, Jan Clothier!


Tuesday, October 29, 2024

Card Keeper Kit Double-Up Class!


Kim Kroeker and I are very excited to bring you our CARD KEEPER KIT DOUBLE-UP CLASS! For a fee of $59, you will make a total of 20 CARDS using the supplies in the Card Keeper Kit from our Kits Collection plus other supplies that we'll provide! You will have more cards to fill the gorgeous Card Keeper box that comes in the kit! Join us online on Sunday, November 17th. There will be LIVE sessions in an exclusive Facebook group from 1:00 to 4:00 pm PT which you can watch from anywhere in Canada (see option below for residents outside of Canada).

To participate in our class sessions, you will need Night of Navy (or black) ink, adhesives, a paper trimmer to cut up the card bases, and a stamp set with sentiments. We will be using the Simply Said Stamp Set which you can add on for $24 plus tax/shipping when registering or you can substitute other stamps that you already have in your stash!

What do you get for your $59 class fee?

  • The Card Keeper Kit which includes 10 card bases and envelopes, die-cuts and instructions for 2 card designs, along with a Card Keeper box and labelled dividers.
  • 18 Make 'n Take kits including all cardstock, envelopes, embellishments and die-cuts, not included in the Card Keeper Kit, to bring your total cards up to 20!
  • Membership to an exclusive Facebook group
  • LIVE video presentations - these will be recorded so you can watch again later
  • 18 written tutorials in a printable PDF including colour photos and measurements
REGISTRATION AND PAYMENT IS DUE BY OCT 31ST

Add-on Options:
Add on the Simply Said Stamp Set for $24 plus tax/shipping. You can also add on any other supplies and tools that you might need (Paper Trimmer, Acrylic Blocks, Night of Navy ink, etc). You must order (including your add-ons) from me by 8 pm PT on October 31st. The total amount due will be given to you for immediate payment by etransfer (to loriwillcox@shaw.ca) or PayPal. A $3 fee will be added if you choose PayPal.

Option for residents outside of Canada:
For $25 CAD (about $18 USD), you will have access to the videos and PDF tutorials and can join us in our exclusive Facebook group! Register on the link below by Nov 13th and I'll send you a PayPal invoice for immediate payment.

The Card Keeper Kits and any add-on products will be direct shipped to you from Stampin' Up!. Make 'n Take kits will be mailed by November 4th. We know that shipping times can vary so there is a slight possibility that they will arrive after the class. If so, you can still enjoy the class with us and put your card kits together afterwards! You can also pick up your package from my home in Hope, BC.


Saturday, October 26, 2024

Otterly Amazing Virtual Stamp Camp!


Join Ange McKay and I at our virtual class featuring the Otterly Adorable Suite Collection. It is so ridiculously cute and will be available starting November 5th, 2024 as part of our Online Exclusives!

Class will be on Saturday, November 23rd at 10am PT on a private, exclusive Facebook Group. Your kit will include 6 fabulous card designs. The cost to attend with be $45 which includes oversized letter mailing through Canada Post. This is not trackable - if you wish to have your package with tracking it will be $10 more - please indicate on your registration if you wish to have this option. 

If you live outside of Canada you can still participate by purchasing the PDF/ FB access only and attend the class by prepping your own supplies. This is only available outside Canada. 

Ange and I can't wait to craft with you!


Your class kit will include:

A goodie bag including:

  • 1/2 package of Otterly Adorable 12" x 12" Designer Series Paper
  • Full package of Riverside Irregular Pearls
  • Lost Lagoon Soft Cording
  • Materials to complete six cards featuring the products in the goodie bag, including envelopes
  • Access to an exclusive Facebook group on November 23rd @ 10 am PT
  • PDF tutorial with instructions for all six card designs including pictures, measurements, supplies and step by step instructions
  • LIVE demonstrations throughout the morning that will be recorded if you can't join us live or if you wish to rewatch them later.


* Availability may require substitution of embellishments & ribbon

* You must provide your own stamps, inks and adhesives

*** Check out the bonus offered for purchasing the Otterly Amazing Bundle or the Otterly Adorable Suite Collection


SPECIAL OFFER

OPTION 1:

Purchase the Otterly Adorable Suite Collection and receive the class for free (no goodie bag with the exception of the make-n-take package)

OPTION 2:

Purchase the Otterly Amazing Bundle and receive a full package of the Otterly Adorable 12" x 12" Designer Series Paper


* In order to earn this bonus you must allow us to order for you - we will direct ship the bundle, DSP, cord and embellishments directly from Stampin' Up! - your card kit will be mailed separately through Canada Post.


Monday, October 14, 2024

Coast to Coast Creators Blog Hop - Gratitude


Welcome to this month's blog hop! Our theme this month is Gratitude. I chose to use stamps from two different stamp sets, Autumn Expressions and Autumn to Remember.


I stamped the wheat from Autumn Expressions in Crumb Cake ink on Basic Beige Cardstock, and the sentiment in Copper Clay on Crumb Cake Cardstock. The leaf is from the Autumn to Remember Stamp Set (in our online Scrapbooking Brochure) and stamped in Cherry Cobbler on a piece of Cajun Craze DSP from the Splendid Autumn 6" x 6" Designer Series Paper.

I matted the Basic Beige piece on Crumb Cake and wrapped some Linen Thread around it before adhering to a Cajun Craze card base.


The sentiment was die cut with a Spotlight on Nature die. I also die cut a circle out of Cajun Craze, using the circle in the Christmas Friends Dies, and adhered it behind the Crumb Cake circle.

I fussy cut the leaf and added some Wink of Stella Glitter to the leaf veins.


I adhered the circle and leaf with Stampin' Dimensionals and added some Faux Glass Dots. I stamped the leaf in Copper Clay on Basic Beige for the inside of the card.


Be sure to hop around below to see the beautiful projects by my talented teammates!


You are invited to the Inlinkz link party!

Click here to enter

Wednesday, October 9, 2024

AWOW Blog Hop - Sketch Challenge


Welcome to this month's Around the World on Wednesday Blog Hop! Each month, a group of  demonstrators from all over the world create projects based on that month's theme. You will be able to hop around below to see all the wonderful inspiration!

This month, the theme is a Sketch Challenge!


I chose to use the adorable Christmas Friends Bundle for my card! I also used Peaceful Evergreens for the trees stamped in the background. 

I started with a Thick Basic White card base and added a Pool Party layer which was embossed with the Snowflake Sky 3D Embossing Folder. The other layers were created with Night of Navy Cardstock and the Subtles and Neutrals 6" x 6" Designer Series Paper in Pool Party and Night of Navy.


The cute skating moose was stamped in Memento Tuxedo Black on Basic White and coloured with Stampin' Blends in Pecan Pie, Crumb Cake, Azure Afternoon, Pool Party and Smoky Slate.

The circle was die cut with the circle in the Christmas Friends Dies. The ice was created by ink dragging Pool Party and Balmy Blue Ink Pads across the bottom of the circle. I then masked off the land area with a Post-It Note and added Night of Navy Ink with a Blending Brush. I added a little Azure Afternoon with a Blending Brush for the sky and stamped the trees in Night of Navy. I added some Wink of Stella to the ice and the skate blades.


I wrapped Night of Navy from the Natural Tones Linen Thread around the middle layer and added a double bow with a Mini Glue Dot. The sentiment was stamped in Night of Navy.


Please enjoy hopping around below and you can click on the daisy to go to the next blog post by my very talented colleague, Cheryl Hamilton!


Thursday, September 26, 2024

Sketch Challenge - September Ink & Inspiration Blog Hop!


Welcome to our September Ink & Inspiration Blog Hop! I am hopping with talented demonstrators from all over the world! This month, we were inspired to create from this great sketch!


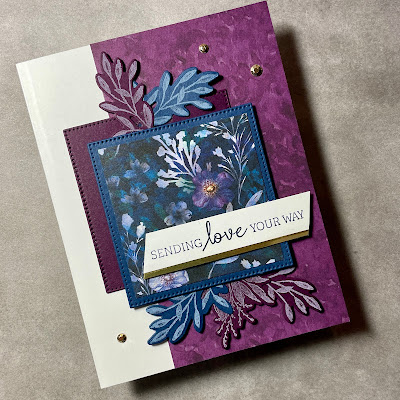
I decided to use the Regal Winter Suite Collection for my card, just using the gorgeous Regal Winter 12" x 12" Designer Series Paper (DSP) and the Regal Flora Stamp Set & Dies Bundle. I started with a Thick Basic White card base and added a layer of DSP in a Blackberry Bliss pattern.


The foliage was stamped in Whisper White Ink on Blackberry Bliss and Night of Navy Cardstock, and then cut with the Regal Flora Dies. Two squares were cut from the same cardstock and the Stylish Shapes Dies (largest squares). I added some DSP in a Night of Navy floral pattern to one square.


The sentiment was stamped in Night of Navy on Basic White. I added a strip of Gold Foil and angled the ends. The navy square, foliage and sentiment were all popped up on Stampin' Dimensionals. I finished with gold embellishments from the Adhesive-Backed Metallic Gems.

Enjoy Hopping!


Saturday, September 14, 2024

Coast to Coast Creators Blog Hop - Sweetest Star


Welcome to our September Coast to Coast Creators Blog Hop!
This month our theme is to use new products from the September - December 2024 Mini Catalogue!


I chose to focus on the Sweetest Star Bundle which includes a stamp set and a punch!
I used Cherry Cobbler and Basic White Cardstock along with the Regal Distressed Patterns 12" x 12" Specialty Designer Series Paper, cut into squares.


The sentiment is heat embossed using WOW! Embossing Powder in white and a Heat Tool. I matted the punched star in Gold Foil, trimmed with Paper Snips.I wrapped the layer with Cherry Cobbler & Gold Satin Ribbon.

I added some Gold Foil snowflakes which were die cut using Snowy Wonder Dies and One of a Kind Dies. I topped the snowflakes with Cherry Cobbler & Pearl Adhesive-Backed Pearls.

Be sure to hop around and see the gorgeous projects by my talented teammates!


You are invited to the Inlinkz link party!

Click here to enter